
New Features
- Schedule report windows and frequencies
- Schedules Module collection frequencies
- Create your own Modules including collection procedure and report procedure.
- Adjust the report ordering of modules in the HTML report
- Customize the warning/advisory header text
- Have more than one warning level per module (Custom modules only)
- Revised PowerBi Template to show Schedule information
Improvements
- Servers used to be locked down to just one ModuleConfig , now they can be locked into one or they can subscribe to all ModuleConfig as you may want to have multiple collections/reports on different schedules for the same server.
- The Backup space module now accepts a comma delimited list of backup paths rather than just a single backup path as you may be backing up to more than one place across your servers.
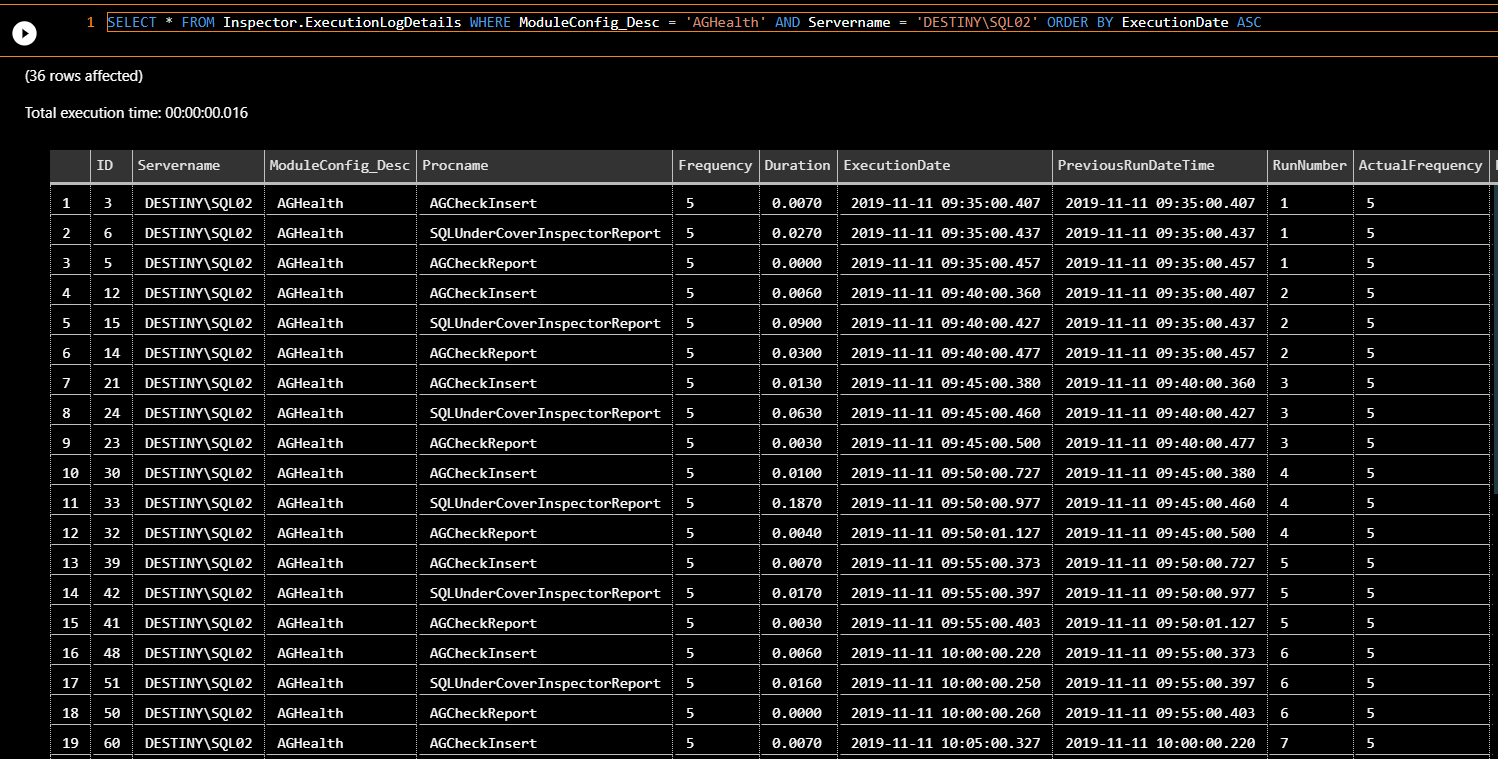
- A new view is available called ExecutionLogDetails which will show you all executions and their frequency information
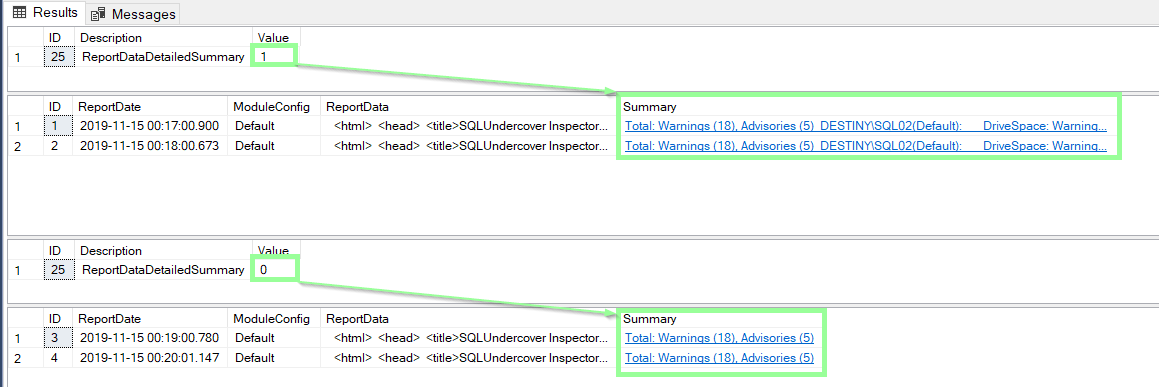
- ReportData.ReportSummary column now has Warning/Advisory counts per server per module in detailed mode, this can be switched back to normal mode if required.
- Back to top hyperlinks now return you back to where you clicked in the header rather than to the top of the report.
Screenshot tour of new features
Custom Report Order
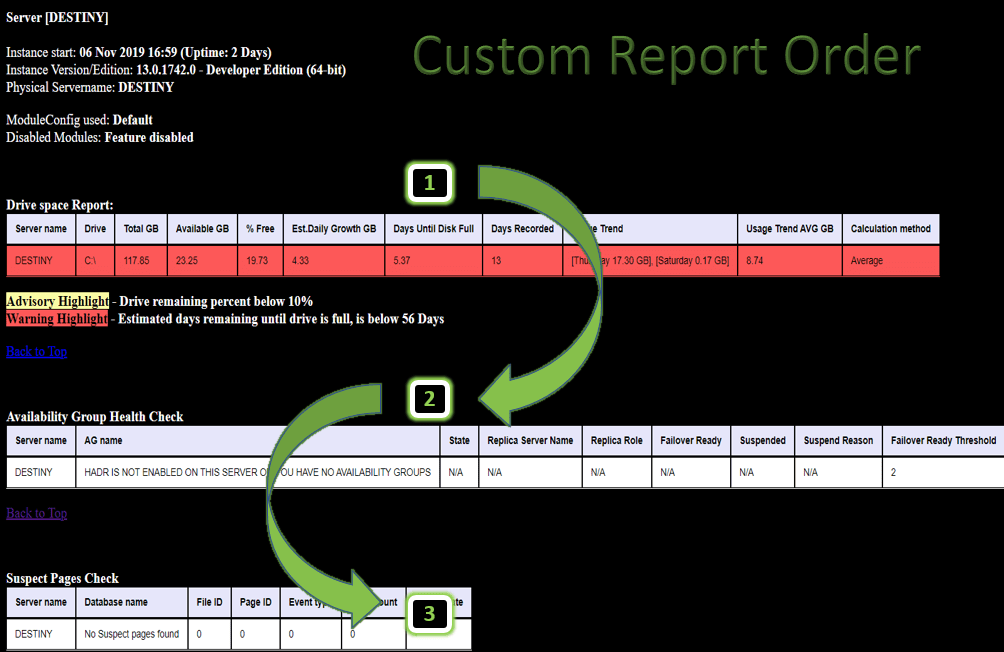

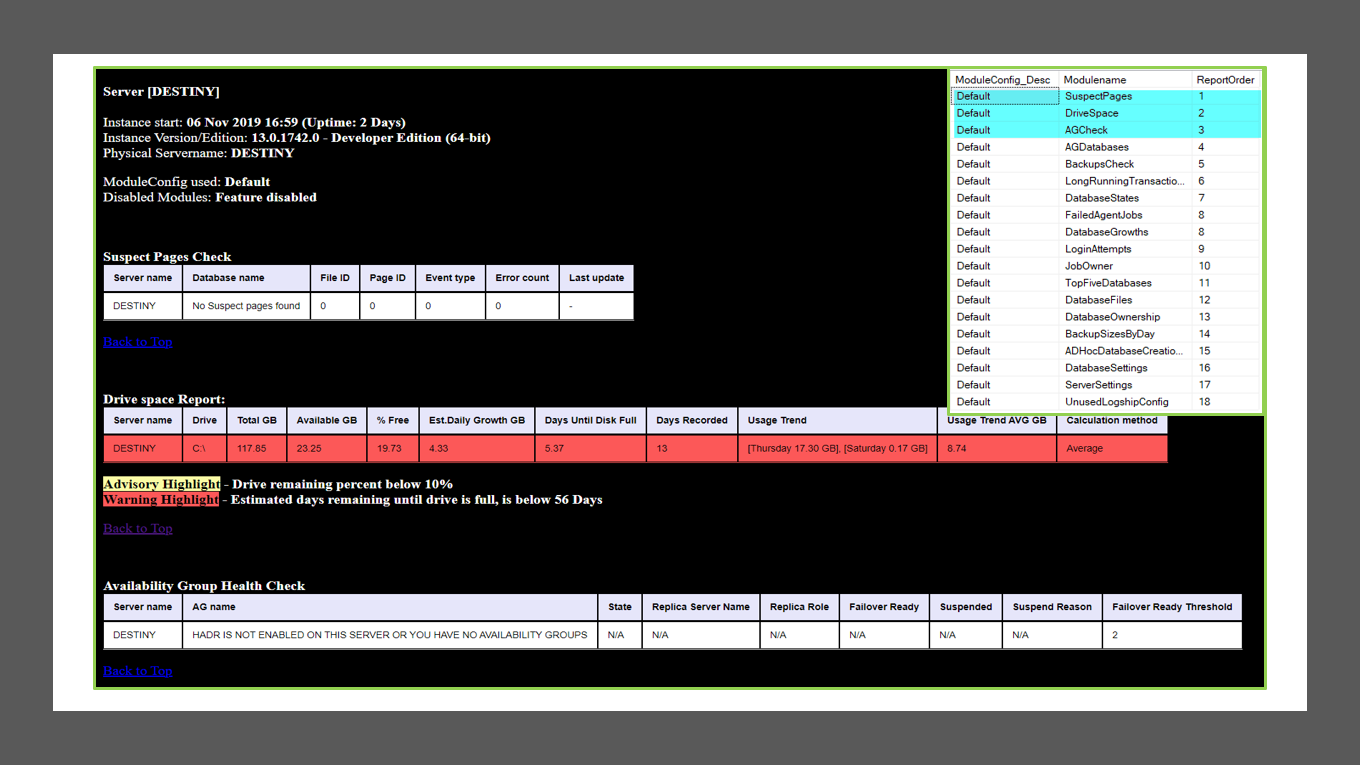
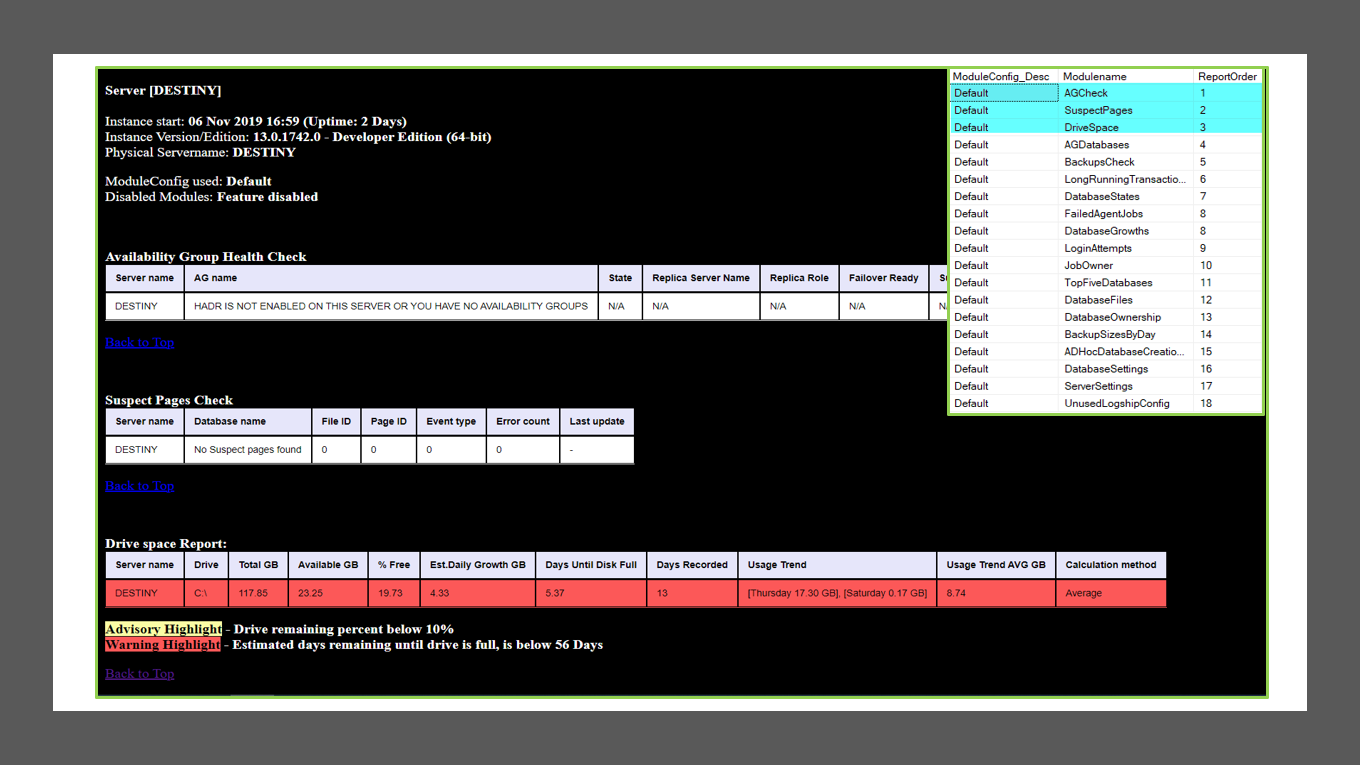
The report order can now be adjusted via the Inspector.Modules table.
Report order is split into two sections , Server specific and non server specific. Server specific modules will report within their respective server section and show only that servers’ information whereas non server specific will be one table that contains all Servers’ information – these tables are situated at the very end of the report e.g Database Growths.
When the report is produced it will look at these sections separately to determine the report order*.
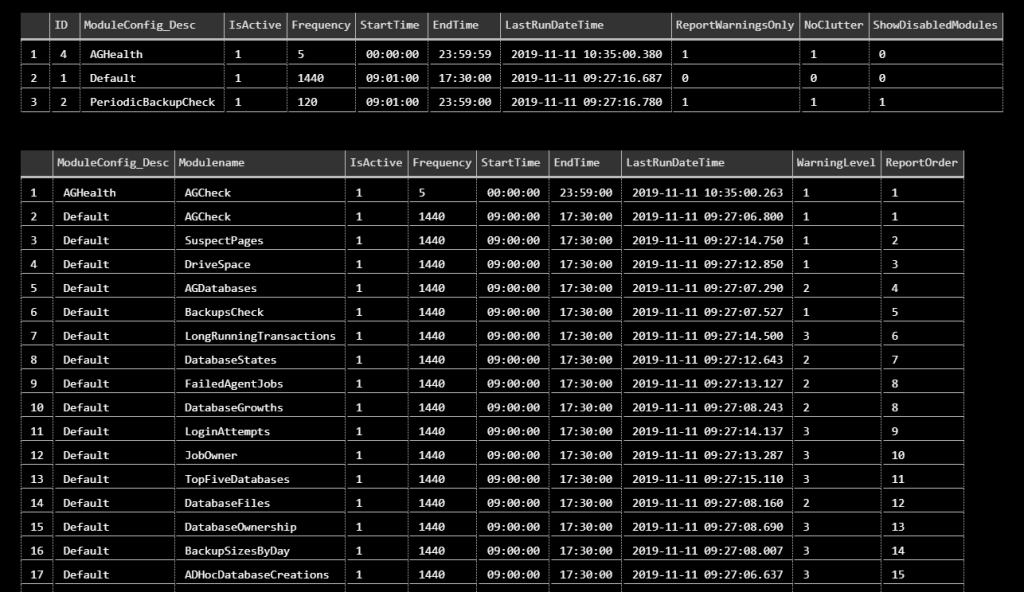
To confirm your ordering you can run the following query:
SELECT *
FROM [Inspector].[Modules]
WHERE IsActive = 1
ORDER BY
ModuleConfig_Desc ASC,
ServerSpecific DESC,
ReportOrder ASC
*Unfortunately none of the built in Inspector modules will support switching between Server specific and Non server specific, this feature was added to benefit custom user create modules so that it allows you to code accordingly. Report order however is fully supported.
Custom Module and Report schedules
The Inspector now runs from a single agent job, this job runs every minute looking for modules (Inspector.Modules CollectionProcedurename) where IsActive = 1 and the frequency,StartTime and EndTime all meet the requirements.
For example – Frequency 1440 (mins) is a once a day module, the StartTime and EndTime window will determine when that module will be executed.
A module with Frequency of 120 will run two hourly based on your StartTime and EndTime and so on, we are giving you the control on when you want modules to execute. If you really want to you can go with a frequency as low as 1 and your module will run every minute , just be sure that the modules you choose will complete within the minute or you may start running behind on your schedules.
You can keep track of module executions in the ExecutionLog table or if you are particularly interested in the frequency of schedules with detailed information you can use the view ExecutionLogDetails.
Customise report header text
Previously the header text was hard coded, now you have some control over what the heading text says per module, the Default header text can be found in the table Inspector. DefaultHeaderText but you can override the text in the Modules table .
SELECT
Modulename,
HeaderText
FROM [Inspector].Modules];

SELECT *
FROM [Inspector].[DefaultHeaderText];


Create custom modules
We have added the ability for you to code your own modules! not only that but we have been able to allow the following scenarios.
- Collect data to a table only
- Report on data only
- Collect data and report on that data
To collect data only:
- Create a new table in the Inspector Schema , this table MUST have the following columns:
Servername NVARCHAR(128)
Log_Date DATETIME
The rest of the columns are up to you! - Create a new stored procedure in the Inspector schema following the naming convention of Procname+’Insert’ i.e DriveSpaceInsert, use this procedure to insert into your new table, for Servername use @@Servername and Log_Date use GetDate()
- If you are creating a new Moduleconfig specific to this module then insert a row into Inspector.ModuleConfig and set Frequency to 1440, StartTime and FinishTime to the same value i.e 00:00 (as you do not want to report on it)
- Insert a row into Inspector.Modules with the relevant details – CollectionProcedurename = your proc name , set ReportProcedurename to NULL as you are not reporting on it.
To Report at report run time only:
- Script out stored procedure [Inspector].[ModuleReportProcTemplate] as this will serve as a template.
- Amend sections labelled /** REQUIRED **/ and if required amend /** OPTIONAL**/ sections.
The most important part here is getting the query right with the CASE statement as this case statement is responsible for the Warning/Advisory highlighting. - Create the stored procedure with a naming convention of Your proc name + Insert i.e DriveSpaceReport
- If you are creating a new Moduleconfig specific to this module then insert a row into Inspector.ModuleConfig and set Frequency, Warninglevel , StartTime and FinishTime and remaining columns accordingly.
- Insert a row into Inspector.Modules with the relevant details – ReportProcedurename = your proc name , set CollectionProcedurename to NULL as you are not collecting data.
Collect data and report on that data:
- Create a new table in the Inspector Schema , this table MUST have the following columns:
Servername NVARCHAR(128)
Log_Date DATETIME
The rest of the columns are up to you! - Create a new stored procedure in the Inspector schema following the naming convention of Procname+’Insert’ i.e DriveSpaceInsert, use this procedure to insert into your new table, for Servername use @@Servername and Log_Date use GetDate()
- If you are creating a new Moduleconfig specific to this module then insert a row into Inspector.ModuleConfig and set Frequency, StartTime and FinishTime accordingly (this is for the report proc)
- Script out stored procedure [Inspector].[ModuleReportProcTemplate] as this will serve as a template.
- Amend sections labelled /** REQUIRED **/ and if required amend /** OPTIONAL**/ sections.
The most important part here is getting the query right with the CASE statement as this case statement is responsible for the Warning/Advisory highlighting. - Create the stored procedure with a naming convention of Your proc name + Insert i.e DriveSpaceReport
- Insert a row into Inspector.Modules with the relevant details – CollectionProcedurename = your collection proc name , set ReportProcedurename to your report proc name , setting the Frequency , Warninglevel, StartTime and EndTime and remaining columns accordingly (StartTime and EndTime in the Modules table applies only to the collection proc)

Multi warning level custom modules
Since adding the ability to create your own modules we thought it would be a good idea to give you the flexibility to allow your Report procedure to raise more than just one Warning/Advisory highlight at a time as you may decide that you want to use some form of threshold mapping. An example of the multi warning level highlighting is the Drive space module.
When you create your custom module and you decide that you are going to code the report procedure to flag multiple warning levels you will need to make sure that you insert the module name into Inspector.MultiWarningModules otherwise your module will be subscribed to the value you gave it in the Modules table. When your module appears in the MultiWarningModules table, the warning level specified against the module in the modules table is ignored and instead all three warning levels will be evaluated against module by stored procedure Inspector.GenerateHeaderInfo.
Improvements to existing functionality.
Improved “back to top” hyperlinks
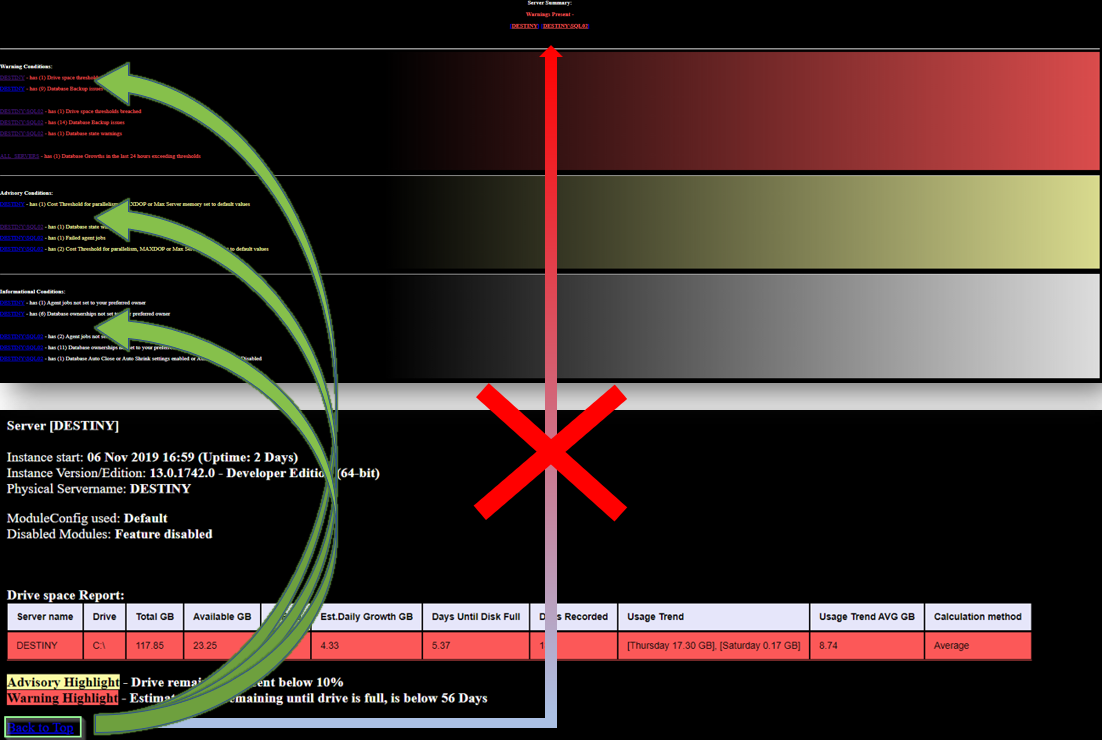
Previously back to top hyperlinks would return you to the top of the HTML report regardless of which header hyperlink took you to the table. We made improvements here to return you back to where you clicked from so you can pick up where you left off rather than having to scroll back to where you were!
Server Module config subscription
Because of the way the new Inspector works it made sense to change the NULL = Default original design. In the Currentservers table you have always had the ability to lock a server down to a specific Module config by setting a ModuleConfig_Desc and by specifying NULL it would always default to the ‘Default’ module config.
The new scheduling functionality took some flexibility away with this format so we made NULL = Subscribe all i.e a server with NULL in ModuleConfig_Desc in the CurrentServers table will now subscribe to ALL Moduleconfig where IsActive = 1 in both the Modules table and the ModuleConfig table.
With these changes it allows you to tailor each server the way you want it as you may want a server or group of servers to have an additional moduleconfig for example, perhaps a custom module that you want to run alongside existing moduleconfig.


Report data summary column
There is a new setting in the Settings table called ‘ReportDataDetailedSummary’ this setting is on or off (0 or 1) and will control the level of detail logged in the summary column. When set to a 1 you will get granular detail of Warning/Advisory counts per server per module, setting this setting to 0 will return it back to the original way of logging which was to summarize the entire report into Warning count and advisory count.

Powershell changes
If you are running the Invoke-SQLUndercoverInspector.ps1 from an agent job in SQL server (cmdexec) then you can use the following samples to help you get started
–Let the Inspector check for all Module config to runpowershell.exe " cd ; import-module .\Invoke-SQLUndercoverInspector.ps1; Invoke-SQLUndercoverInspector -LoggingDB SQLUndercover -CentralServer SQL02 -ModuleConfig Default -NoClutter $true";
–Force the inspector to check for only the Default Moduleconfig, replace default for others that you wish to run on their own i.e PeriodicBackupCheckpowershell.exe " cd ; import-module .\Invoke-SQLUndercoverInspector.ps1; Invoke-SQLUndercoverInspector -LoggingDB SQLUndercover -CentralServer SQL02 -ModuleConfig Default -NoClutter $true"
There are two new parameters due to the nature of V2 and the way it now polls for executions/reports that are due every minute, the powershell collection by default will now only centralise what is currently due to run however
you can use these two new parameters to change the behaviour:
-RunCollection $true – this will ignore schedules and force execution
-CreateReport $true – will generate a report at run time and ignore report schedules
Install-Inspector.ps1
$ScriptPath now accepts a file path or a URL to an Inspector installation file.
$SQLInstances – Specify all SQL instance names here where you want to install the inspector to.
$UseWindowsAuth – Y or N unfortunately only one credential will be stored so the credential will need to work on all instances specified.
$DataDrive = “S,U” – specify drives here , they can be changed later in the Settings table so you can leave this as is if you want to.
$LogDrive = “T,V” – same as above
$BackupsPath = “NULL” – Specify a backup path to check space against or leave as “NULL” can be changed in the Settings table later if needed.
$LinkedServername = “NULL” – If you have a linked server setup already and want to use it for centralizing data then pop the name of the linked server here.
$EmailRecipients = “NULL” – Set email recipients, semi colon delimited or leave as NULL, can be changed in the EmailRecipients table later if needed.
