
Since witnessing a rather nasty cyber attack around a year ago, I’ve been thinking quite a bit about security. Do we really know how secure our SQL Servers are? Penetration testing is a great way to find out where our weaknesses and vulnerabilities are. Ideally you probably want to be getting regular pen tests conducted by external companies (although in my experience, some are better than others. I’ve known some who argue totally pointless issues and miss glaring holes which I know exist, but that’s a whole different story) but wouldn’t it be useful if we could conduct some of these tests ourselves?
In this series of posts, I’m going to try to knock together a little pen testing toolbox so that we can hopefully find some of these vulnerabilities. I’m no pen testing expert and this is never going to replace getting a professional pen tester in to test your setup but it might go some way to helping us understand some of our vulnerabilities and identify them.
I like to approach this from the mindset of a dirty little hacker, I thought about how an attacker is likely to want to move around our systems.
First step, reconnaissance
Once our hacker has gained access to your network, he’s going to need to figure out what his targets are. He’s going to carry out a little reconnaissance mission to try to identify all the SQL servers on the network.
This brings us to the first tool in our tool box, a free port scanner called nmap. It can be downloaded from nmap.org.
Once installed, it will provide us with a command line tool as well as a GUI. In this post, I’m going to be using the command line tool.
Using nmap To Scan an IP Range for Port 1433
When using nmap, we need to provide it with a target IP range (in the case of my test domain, that’s 10.10.10.1-255). We can also filter on IP address and as SQL server runs on port 1433, it seems sensible to filter on that, right? Also, the -sV switch will give us a little more detail into the services it finds listening on the port.
nmap 10.10.10.1-255 -p 1433 -sV

So, as you can see, nmap has managed to discover 2 SQL Servers on my network. It’s also managed to find out a few useful bits of information as well. We’ve got the IP address but we’ve also got the version number. Why is the version number important?
Well if we know that a certain patch level of SQL had a particular vulnerability we could now think about exploiting that vulnerability.
So now we’ve got a list of targets that we can think about attacking. How easy was that?
What If We Change SQL to Listen on a Non-Standard Port?
But this is exactly the reason why we run our SQL Servers on a non-standard port, I can hear you all cry.
OK, let’s do that. I’ll change my SQL Servers to listen on port 10000.
Let’s run nmap again and see what happens…

Wow, no SQL instances were found. So by changing the SQL port, we’ve bamboozled any would be hackers? Right?
Well, no not really and this is why I’m not a particularly big fan of the argument that it’s more secure to run SQL from a non-standard port (something I’ve written about elsewhere and won’t get hung up on here).
Let’s try running nmap with that -p filter removed, that’ll cause nmap to scan across all ports.
nmap 10.10.10.1-255 -sV
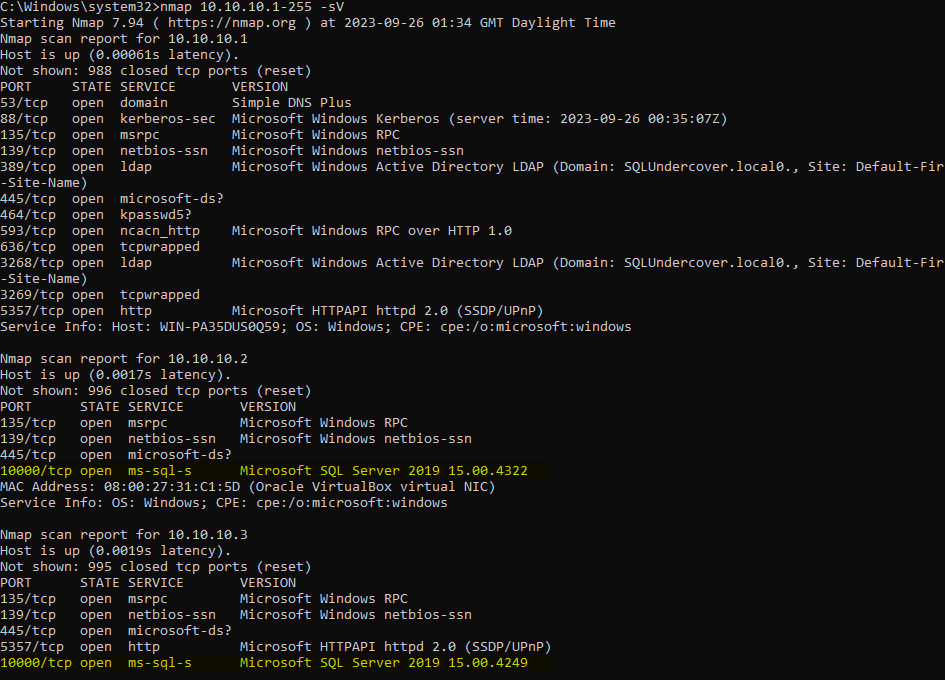
eeek, so even when hiding behind a non-standard port we’ve managed to track down both of the SQL Servers.
I’d better change them back to 1433 before I forget and wonder why things aren’t working properly.
So Here’s Your First Test, Did You Trip any Alarms with You Recon Mission?
This is test number one, have you got any alarms flashing telling you that someone might be snooping around? I have, I’ve just got an email in my inbox to warn me that someone might be up to mischeif.
A while ago I wrote Using SQL Alerts to Spot Suspicious Activity in SQL and this is exactly one of those occasions that would trip an alert I’ve created.
Let’s check the SQL error log…
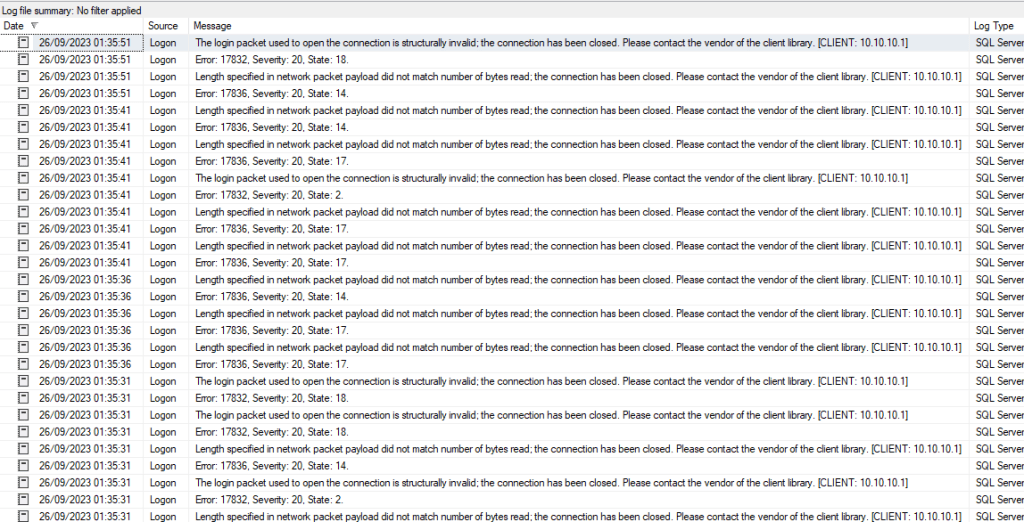
Two of the error codes that I’m watching out for in the ‘Urgent Potential Attack’ alerts that I spoke about in ‘Using SQL Alerts to Spot Suspicious Activity in SQL‘. If you’ve got those alerts set up, you should already be aware that someone is sniffing around your SQL Servers.
Pro Tip, Run the Results out to a File
For this post, I’ve just been using the results displayed in the console but I can get away with that as I’ve only got three servers online in my test domain at the moment. I’m going to bet that you’ve got a few more than three and might find using the console a little unwieldy.
If that’s the case, you can send the results out to a file to make searching them easier using the -oG <file name> switch.
Thanks for reading, I hope you found it interesting. In the next part of the series, we’ll use the information we gained from our recon mission and see if we can start to exploit those servers.
